Case
Home / Case / Experience / Installation instructions of bellows globe valve

Case

① Remove any material remains of the valve wrapping.
② Serious problems may arise with the installation of a valve in a dirty pipe.
③ Make sure the pipe is not dirty and doesn’t have welding particles, for example, before installing it. This may cause irreparable damages in the valve when the equipment is started → prepare a clean working area.
④ Plan beforehand enough space for future maintenance operations.
⑤ Control the correct performance of the valve by turning the handwheel both sides (close and open) and observing if the disc or needle slides correctly. If this is not the case, check if there are foreign particles inside the valve and repeat the whole operation.
⑥ In case of vibrations in the pipe it is strongly recommended to mount anti-vibration elements to absorb them. Otherwise, the life of the product could be drastically reduced.
Design for this kind of regulation valves allows only one position for assembling it to the pipe, specified by means of an arrow in the valve's body that indicates the direction in which the fluid needs to circulate.
NOTE: DN150 and DN200 the direction flow is reversed, the fluid input is from top part of the disc.

① Do not disassemble the valves to install them.
② Make sure the pipe's and edges flanges of the valve are clean.
③ Use the corresponding screws in all of the flanges drill holes.
④ Place an adequate joint in each end and align it in the center of the flanges.
⑤ Tighten screws evenly and cross-shaped to avoid deformations. To do so, you must not force in any case the pipe to center the valve; it should take its position smoothly. Last, verify that screws are tightened with the recommended torque for each type of screw.
⑥ Make sure the flanges joints are well placed.
⑦ After assembling, check the tightness and performance of the valve.
It is recommended to install the valve (from DN15 to DN125) in horizontal position and the handwheel upwards. NEVER install with handwheel down.
Valves do not have to support pipe's efforts so it is advisable to anticipate a good alignment and parallelism of such pipe.
It is also recommended to use filters in the pipe to extend lifecycle of the valve.
When installed on steam systems a suitable steam trap should be fitted immediately upstream of the isolation valve to drain condensate. This will ensure drainage of the pipe when the valve is closed, and will prevent damage of the valve due to waterhammer.
① GENEBRE valves provide a leakproof lock when used adjusted to the pressure and temperature values for which they have been designed.
② Valve materials have to be fully compatible with the fluid circulating through the valve.
③ Otherwise, valve could be seriously damaged.
Do not use for slurries or fluids containing solids that can build up in valve cavities.
When operating the valve you must avoid excessive lateral efforts with the handwheel.
To close, the operation consists in turning the handwheel clockwise and anticlockwise if you want to open the valve.
Always open isolation valves slowly to avoid system shocks.
Frequency, place and process of maintenance will be determined by the user by taking into account usage of the product. However, periodical checks explained below will be useful to extend the service life of the valve and reduce installation problems.
1.Valves must not remain in open or closed position for a long period of time. It is recommended, if the process allows for it, to operate it for control purposes every six months.
2.Verify possible leaks in the stem area; in case they exist, it is likely that the bellows is damaged; stem and bellow should be replaced (see section 7).
3.Verify possible leaks through the line (due to closure); this defect is probably caused by deposition of impurities between the disc or needle and the seat, transported by the fluid. Disassemble the valve from the pipe, clean it thoroughly and reinstall it. If the problem persists you should change the valve, since it is possible that some metallic parts used for closure are damaged (erosion, corrosion).
4.Keep the stem well greased, for it use the lubricating nipple.
“Pay attention, that the lubricant is suitable for the media”.

Before disassembling the pipe's valve to clean or replace it, make sure that line has been closed and depressurized because a bad operational procedure could cause a serious accident to staff and installation system.
You must remove the valve from its installation to repair it, making sure the pipe has been previously depressurized.
Prepare a clean working area and adequate tools to perform mechanical tasks.
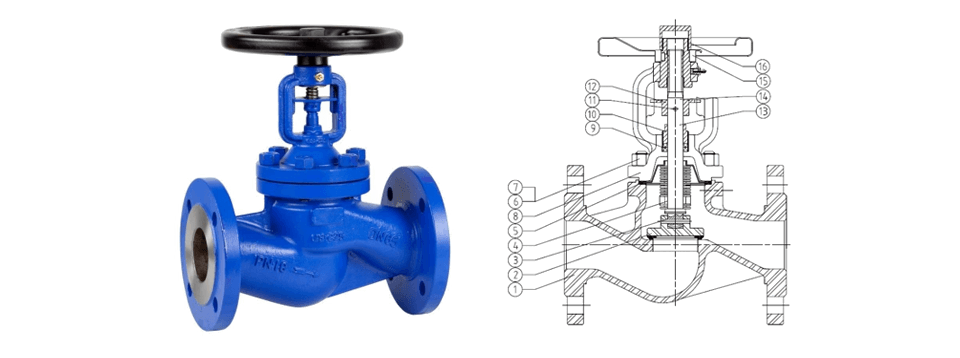
a. Loosen and remove the nut (part.16), remove the handwheel (part.15).
b. Loosen and remove the nuts (part.7)
c. Remove the Bonnet (part.8), Stem (part.13) and Disc (part.2) of the valve Body
(part.1).
d. Loosen totally the gland (part.10).
e. Take out the pin (part.11).
f. Remove the Stem (part.13), bellow (part.4) and Disc (part.2) assembly of the
Bonnet (part.8).
g. Take out the pin (part.3) and remove the Disc (part.2) of the stem (part.13).
h. Remove the gasket (part.5) of the body (part.1) and remove the packing (part.9) of
the Bonnet (part.8).
Once the valve is completely disassembled, you must verify the state of each one of the pieces that compose it and the ones to be reused will have to be completely cleaned and stored in a safe and clean environment.
All locking surfaces, seats, joints and sides have to be checked for corrosion, erosion, metallic inlays and marks. If they were damaged or in case of doubt, they will need to be replaced.
Cleaning of the valve's pieces must be done using an adequate degreasing agent. You must be careful with the locking surfaces, locking sides of the ends and joints, because if they were damaged this could cause a bad impact in the valve's performance.
Before proceeding to reassemble the valve, make sure that reparation kit and/or pieces to be used are appropriate and original from the factory.
When it is assembled again, cleaning is essential for a long life for the valve.
a. Place the disc (part.2) in the new stem / bellow assembly and after place the pin (part.3).
b. Place the new packing (part.9) in the bonnet (part.8).
c. Introduce the stem (part.13), bellow (part.4) and disc (part.2) assembly in the bonnet (part.8).
d. Fix with pin (part.11) the guide (part.12) and the stem (part.13).
e. Place the new gasket (part.5) in the body (part.1).
f. Place the bonnet assembly over the body (part. 1), place the nuts (part.7) on the bolts (part.6) to bring together the two different parts of the valve.
g. Then, tighten the nuts (part.7) adjusting slowly and alternating diagonally and evenly until obtaining the recommended tightening torque (see Torque table 7.3.
h. Tight the gland (part.10).
i. Place the handwheel (part.15).
j. Place and tight the nut (part.16)